mNo edit summary Tag: rte-source |
LinkTheLefty (talk | contribs) mNo edit summary |
||
| (21 intermediate revisions by 8 users not shown) | |||
| Line 1: | Line 1: | ||
{{Level-infobox |
{{Level-infobox |
||
| − | |image = [[File:KRtDL White Wafers plaque.png |
+ | |image = [[File:KRtDL White Wafers plaque.png]] |
|caption = ''[[Kirby's Return to Dream Land]]'' icon |
|caption = ''[[Kirby's Return to Dream Land]]'' icon |
||
| − | |jap_name = ホワイト ウェハース (Howaito |
+ | |jap_name = ホワイト ウェハース (Howaito Wehāsu) |
| − | |jap_meaning = ホワイト |
+ | |jap_meaning = White Wafers <br>ホワイト = White, ウェハース = Wafers |
|appearance = {{LevelSequence|KRtDL|4|type=Level}} |
|appearance = {{LevelSequence|KRtDL|4|type=Level}} |
||
|theme = Arctic Tundra |
|theme = Arctic Tundra |
||
|world = [[Planet Popstar]] |
|world = [[Planet Popstar]] |
||
| + | |icon = [[File:KRtDL_White_Wafers_icon.png|60px]] |
||
|boss = [[Goriath]] |
|boss = [[Goriath]] |
||
|mini-boss = [[Gigant Edge]], [[Super Bonkers]], [[Sphere Doomer]], [[Water Galboros]] |
|mini-boss = [[Gigant Edge]], [[Super Bonkers]], [[Sphere Doomer]], [[Water Galboros]] |
||
| − | |common enemies = [[ |
+ | |common enemies = [[Armor Dee]], [[Babut]], [[Barbar]], [[Blade Knight]], [[Blipper]], [[Bouncy Sis]], [[Bouncy]], [[Bronto Burt]], [[Broom Hatter]], [[Bulby]], [[Cappy]], [[Cerulean]], [[Chilly]], [[Coldtzo]], [[Como]], [[Craby]], [[Degout]] ([[Extra Mode]]), [[Foley]], [[Galbo]], [[Gemra]], [[Glunk]], [[Gordo]], [[Key Dee]], [[Knuckle Joe]], [[Lanzer]], [[Leafan]], [[Moonja]], [[Mopoo]], [[Mumbies]], [[Needlous]], [[Nruff]], [[Pluid]], [[Poppy Bros. Jr.]], [[Puppet Dee]], [[Rocky]], [[Scarfy]], [[Sheld]], [[Shotzo]], [[Sir Kibble]], [[Snowl]], [[Sparky]], [[Squishy]], [[Strike Box]], [[Super Chilly]], [[Togekuki]], [[Waddle Dee]], [[Waddle Doo]], [[Walf]], [[Walky]], [[Wapod]] |
}} |
}} |
||
{{Quote|A wintry stage that's covered in ice and snow.|Official European ''Kirby's Return to Dream Land'' website}} |
{{Quote|A wintry stage that's covered in ice and snow.|Official European ''Kirby's Return to Dream Land'' website}} |
||
| Line 15: | Line 16: | ||
==General Information== |
==General Information== |
||
| − | White Wafers is a typical snow-themed world |
+ | White Wafers is a typical snow-themed world, with levels featuring blankets of snow and slippery ice platforms. Huge cryovolcanoes tower over the horizon - possibly the cause of the wintery landscape, as well as numerous geysers that expel a [[Mopoo]] every so often and frozen caverns that burrow deep underground. [[Ice]]-bearing enemies, such as [[Snowl]]s and [[Chilly]]s, and [[Fire]]-bearing enemies, such as [[Galbo]]s are especially common amongst the levels. The world introduces [[Ice Block]]s and [[Fire Block]]s, which can only be destroyed by using specific abilities. Kirby can use [[Super Abilities]] to clear the way in some stages, revealing [[dimensional rift]]s. The boss of White Wafers is [[Goriath]]. |
==Copy Abilities== |
==Copy Abilities== |
||
| Line 38: | Line 39: | ||
|[[File:KRtDL Water icon.png|x55px|link=Water]][[File:KRtDL Water UI.png|x55px|link=Water]]<br />[[Water]] |
|[[File:KRtDL Water icon.png|x55px|link=Water]][[File:KRtDL Water UI.png|x55px|link=Water]]<br />[[Water]] |
||
|[[File:KRtDL Whip icon.png|x55px|link=Whip]][[File:KRtDL Whip UI.png|x55px|link=Whip]]<br />[[Whip]] |
|[[File:KRtDL Whip icon.png|x55px|link=Whip]][[File:KRtDL Whip UI.png|x55px|link=Whip]]<br />[[Whip]] |
||
| − | | |
+ | |} |
| + | |||
| + | ===Super Abilities=== |
||
| + | {| class="wikitable" cellpadding="0" cellspacing="0" style="width: 660px; text-align: center;" |
||
|[[File:KRtDL Grand Hammer icon.png|x55px|link=Grand Hammer]][[File:KRtDL Grand Hammer UI.png|x55px|link=Grand Hammer]]<br />[[Grand Hammer]] |
|[[File:KRtDL Grand Hammer icon.png|x55px|link=Grand Hammer]][[File:KRtDL Grand Hammer UI.png|x55px|link=Grand Hammer]]<br />[[Grand Hammer]] |
||
|[[File:KRtDL Snow Bowl icon.png|x55px|link=Snow Bowl]][[File:KRtDL Snow Bowl UI.png|x55px|link=Snow Bowl]]<br />[[Snow Bowl]] |
|[[File:KRtDL Snow Bowl icon.png|x55px|link=Snow Bowl]][[File:KRtDL Snow Bowl UI.png|x55px|link=Snow Bowl]]<br />[[Snow Bowl]] |
||
|} |
|} |
||
| + | |||
| + | ==[[Energy Sphere]]s== |
||
| + | ===Stage 1=== |
||
| + | #Use [[Fire]] from [[Galbo]] to melt [[Ice Block]]s. |
||
| + | #In the room with the [[Cannon]]s, shoot upward into a hole in the ceiling instead of shooting at the [[Togekuki]]s. |
||
| + | #In the open area of the cannon room, aim to the green cannon to the bottom right, and then aim bottom-left into a cannon near the abyss. |
||
| + | |||
| + | ===Stage 2=== |
||
| + | #Use Fire to light the fuse of a cannon. |
||
| + | #Use the second [[Stomper Boot]] to destroy the [[Durable Block]]s and bounce on the [[Mopoo]]s. |
||
| + | #Use [[Grand Hammer]]'s Super Hammer Plus to pound one of the the large [[Strike Box]]es. This will reveal a [[Dimensional rift]] zone. Defeat the Green [[Sphere Doomer]] at the end of the Dimensional rift zone. |
||
| + | #Defeat the Green Sphere Doomer at the end of the Dimensional rift zone. |
||
| + | |||
| + | ===Stage 3=== |
||
| + | #Obtain [[Spear]] from [[Lanzer]] in the first room, use it to hit a [[Switch]] in the next room. |
||
| + | #Use the [[Invisibility Stone]] and Fire. The Invisibility Stone allows the player to pass through ice balls; Fire is used to melt Ice Blocks obstructing a ladder. Once all of the Ice Blocks are melted, grab the Invisibility Stone and climb up the ladder. Then, pass through the crystal wall and the ice balls. Let go of the Invisibility Stone to destroy the [[Bomb Block]] before grabbing it again to pass through the giant ice ball. |
||
| + | #Obtain [[Cutter]] from [[Sir Kibble]]. Use Hyper Boomerang to that it can bounce off the wall and cut the string suspending the heavy platform. After entering the optional room, use Hyper Cutter to hit the Switch, allowing the giant ice ball to fall. |
||
| + | #Use [[Water]] from [[Water Galboros]] to hit the Switch while on the rising platform and holding a [[Key]]. Bring the Key to the lock. |
||
| + | |||
| + | ===Stage 4=== |
||
| + | #In the second room, jump into the Cannon. |
||
| + | #Race the [[Key Dee]]. Bring the Key to the lock with the Energy Sphere behind it instead of the one with [[Scarfy|Scarfies]] behind it. |
||
| + | #Use [[Snow Bowl]] to complete the snowman. This will reveal a Dimensional rift. Enter the Dimensional rift zone and defeat the Green Sphere Doomer at the end. |
||
| + | #Defeat the Green Sphere Doomer at the end of the Dimensional rift zone. |
||
| + | |||
| + | ===Stage 5=== |
||
| + | #After obtaining the [[Cracker]], there is an optional room in between the moving platforms. Enter the optional room and use the Cracker to destroy the [[Metal Block]]s. |
||
| + | #Obtain Fire from Galbo in the room with the Cracker and [[Coldtzo]]s. In the next room, melt the Ice Blocks to reveal an optional room. I the optional room, destroy the Bomb Block an make it to the end. In the first section, jump before the Bomb Block chain reaches the raised part of the floor; in the second section, take the lower route; in the third section, float up to the top before the Bomb Block chain reaches the raised part of the floor. After passing the blocks created, keep running. |
||
| + | #In the dark room, use the first [[Candle]] or Fire to melt the Ice Blocks to reveal an optional room. In the optional room, use [[Ice]] from [[Chilly]] to freeze a Mopoo and kick it at the Switch. |
||
| + | #Bring the Key to the locked door on the left. |
||
| + | |||
| + | ===Stage 6=== |
||
| + | #Defeat [[Goriath]] to obtain the Emblem. |
||
| + | |||
| + | ==Trivia== |
||
| + | *One of the tunes in Stage 5 was reused as the music for the EX Stage of [[Overload Ocean]] in ''[[Kirby: Planet Robobot]]''. |
||
| + | *The music that plays in the beginning of Stage 1 is similar to [[Shiver Star]]'s music from ''[[Kirby 64: The Crystal Shards]]''. |
||
| + | <gallery type="slideshow"> |
||
| + | KSA White Wafers Puzzle (1).jpg|First block formation (Clash at Castle Dedede) |
||
| + | KSA White Wafers Puzzle (2).jpg|Second block formation (Clash at Castle Dedede) |
||
| + | KSA White Wafers Puzzle (3).jpg|Third block formation (Clash at Castle Dedede) |
||
| + | KSA White Wafers Puzzle (4).jpg|Dark Meta Knight returns across the top of the screen (Clash at Castle Dedede). |
||
| + | </gallery> |
||
| + | *A bonus room in Stage 5 of White Wafers served as the model for a [[Secret area#Kirby Star Allies|secret area]] in [[Clash at Castle Dedede]] in ''[[Kirby Star Allies]]''. It differs by having enemies and a mid-boss, and its last block structure is different as well. |
||
==Gallery== |
==Gallery== |
||
<gallery> |
<gallery> |
||
| − | stage-4-1.jpg|'' |
+ | stage-4-1.jpg|''Kirby's Return to Dream Land'' |
stage-4-2.jpg|''Kirby's Return to Dream Land'' |
stage-4-2.jpg|''Kirby's Return to Dream Land'' |
||
stage-4-3.jpg|''Kirby's Return to Dream Land'' |
stage-4-3.jpg|''Kirby's Return to Dream Land'' |
||
| Line 53: | Line 101: | ||
{{Levels}} |
{{Levels}} |
||
| + | |||
| + | [[es:Carámbanos Caramelo]] |
||
| + | [[ja:ホワイト ウェハース]] |
||
| + | [[zh:白色威化]] |
||
[[Category:Levels]] |
[[Category:Levels]] |
||
[[Category:Levels in Kirby's Return to Dream Land]] |
[[Category:Levels in Kirby's Return to Dream Land]] |
||
| + | [[Category:Ice]] |
||
Revision as of 22:18, 1 December 2019
| “ | A wintry stage that's covered in ice and snow.” |
| — Official European Kirby's Return to Dream Land website |
White Wafers is the 4th level in Kirby's Return to Dream Land. It is the fourth area on Planet Popstar that Kirby and company journeys through the world in order to find the Lor Starcutter's emblem.
General Information
White Wafers is a typical snow-themed world, with levels featuring blankets of snow and slippery ice platforms. Huge cryovolcanoes tower over the horizon - possibly the cause of the wintery landscape, as well as numerous geysers that expel a Mopoo every so often and frozen caverns that burrow deep underground. Ice-bearing enemies, such as Snowls and Chillys, and Fire-bearing enemies, such as Galbos are especially common amongst the levels. The world introduces Ice Blocks and Fire Blocks, which can only be destroyed by using specific abilities. Kirby can use Super Abilities to clear the way in some stages, revealing dimensional rifts. The boss of White Wafers is Goriath.
Copy Abilities
 Beam |
 Bomb |
 Cutter |
 Fighter |
 Fire |
 Ice |
 Leaf |
 Mike |
 Needle |
 Ninja |
 Spark |
 Spear |
 Stone |
 Sword |
 Water |
 Whip |
Super Abilities
 Grand Hammer |
 Snow Bowl |
Energy Spheres
Stage 1
- Use Fire from Galbo to melt Ice Blocks.
- In the room with the Cannons, shoot upward into a hole in the ceiling instead of shooting at the Togekukis.
- In the open area of the cannon room, aim to the green cannon to the bottom right, and then aim bottom-left into a cannon near the abyss.
Stage 2
- Use Fire to light the fuse of a cannon.
- Use the second Stomper Boot to destroy the Durable Blocks and bounce on the Mopoos.
- Use Grand Hammer's Super Hammer Plus to pound one of the the large Strike Boxes. This will reveal a Dimensional rift zone. Defeat the Green Sphere Doomer at the end of the Dimensional rift zone.
- Defeat the Green Sphere Doomer at the end of the Dimensional rift zone.
Stage 3
- Obtain Spear from Lanzer in the first room, use it to hit a Switch in the next room.
- Use the Invisibility Stone and Fire. The Invisibility Stone allows the player to pass through ice balls; Fire is used to melt Ice Blocks obstructing a ladder. Once all of the Ice Blocks are melted, grab the Invisibility Stone and climb up the ladder. Then, pass through the crystal wall and the ice balls. Let go of the Invisibility Stone to destroy the Bomb Block before grabbing it again to pass through the giant ice ball.
- Obtain Cutter from Sir Kibble. Use Hyper Boomerang to that it can bounce off the wall and cut the string suspending the heavy platform. After entering the optional room, use Hyper Cutter to hit the Switch, allowing the giant ice ball to fall.
- Use Water from Water Galboros to hit the Switch while on the rising platform and holding a Key. Bring the Key to the lock.
Stage 4
- In the second room, jump into the Cannon.
- Race the Key Dee. Bring the Key to the lock with the Energy Sphere behind it instead of the one with Scarfies behind it.
- Use Snow Bowl to complete the snowman. This will reveal a Dimensional rift. Enter the Dimensional rift zone and defeat the Green Sphere Doomer at the end.
- Defeat the Green Sphere Doomer at the end of the Dimensional rift zone.
Stage 5
- After obtaining the Cracker, there is an optional room in between the moving platforms. Enter the optional room and use the Cracker to destroy the Metal Blocks.
- Obtain Fire from Galbo in the room with the Cracker and Coldtzos. In the next room, melt the Ice Blocks to reveal an optional room. I the optional room, destroy the Bomb Block an make it to the end. In the first section, jump before the Bomb Block chain reaches the raised part of the floor; in the second section, take the lower route; in the third section, float up to the top before the Bomb Block chain reaches the raised part of the floor. After passing the blocks created, keep running.
- In the dark room, use the first Candle or Fire to melt the Ice Blocks to reveal an optional room. In the optional room, use Ice from Chilly to freeze a Mopoo and kick it at the Switch.
- Bring the Key to the locked door on the left.
Stage 6
- Defeat Goriath to obtain the Emblem.
Trivia
- One of the tunes in Stage 5 was reused as the music for the EX Stage of Overload Ocean in Kirby: Planet Robobot.
- The music that plays in the beginning of Stage 1 is similar to Shiver Star's music from Kirby 64: The Crystal Shards.

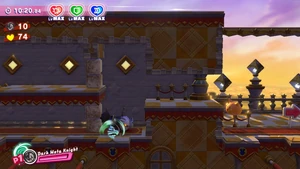


- A bonus room in Stage 5 of White Wafers served as the model for a secret area in Clash at Castle Dedede in Kirby Star Allies. It differs by having enemies and a mid-boss, and its last block structure is different as well.
Gallery
")
")
")
")
")


