The Battle of Blizzard Bridge is the twentieth stage in Kirby and the Forgotten Land. It is the fourth stage of Winter Horns. It succeeds Windy, Freezing Seas and precedes An Unexpected Beast King.
General Information[]
This stage acts as a Mid-Boss Tower. Upon beginning the stage, Kirby and Elfilin land via Warp Star outside a massive bridge shrouded in mist. A looming brick building can be seen abovehead, creating an archway to head through. Upon beginning the trek forward, Kirby is faced with a Sir Kibble and Bernard. Whether Kirby inhales them or not, he is shortly attacked by Wild Edge. After defeating the mid-boss, Kirby should inhale him for the Sword ability. Directly after, Kirby is offered a Star Coin pile and a food item. He can then proceed into a nearby doorway to face the stage's first ability challenge. Here, Kirby must use the Sword ability to cut down a cone from a vine such that it lands on a moving platform rather than the water under it. After, he must use Cone Mouth to time a ground pound onto a thinner platform and break open a crack in the ground. This reveals an Energy Drink and a Waddle Dee in a Treasure Chest. He can then leave the room and proceed to the next fight.
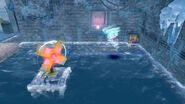
A Mookie found before the next mid-boss grants the player a chance to use Hammer ability on the upcoming boss, Fleurina. After defeating her and obtaining the Tornado ability, Kirby can collect more Star Coins and food before heading into the next challenge room. In this room, Kirby must use Tornado to activate a Fan to open a gate, hit a pink switch behind the gate, causing several platforms and a vending machine to temporarily rise from the water, and use the Vending Mouth to quickly move to a shutter and break it. Doing so rewards the player with another Waddle Dee. A path of blocks then spawns, creating a bridge back to the door. After exiting, Kirby will have another intermission before the next mid-boss fight.
A Corori and Poppy Bros. Jr. both stand before the next mid-boss. Along the path-which contains two broken-off platforms from the bridge-the player can find a Gotcha Capsule on the second platform. After the following fight against Wild Bonkers, Kirby is rewarded by the largest pile of Star Coins yet. He should then pound in a Stake to open a door leading the the next puzzle room. In this room, Kirby must pound another stake, which spawns a timed Waddle Dee behind a cracked wall and causes a platform in the wall to retract before pushing back out slowly. He must repeat the process with several more stakes and platforms before reaching a car, which he should inhale to get Car Mouth before speeding down the path. If Kirby manages to hurry past the platforms in time, he can rescue the stage's next Waddle Dee before returning down the bridge.
Kirby is immediately faced by a Needlous and Hot Head before traversing across 3 smaller, broken-off bridge platforms. A Digguh awaits him on the other side, followed by the final fight against Twin Wild Frosty. After defeating them and obtaining the Ice ability, Kirby is rewarded with two Star Coin piles and a Treasure Chest containing the Frosty Ice Blueprint. The player can then head to a hidden alley on the right to extinguish some Fire Blocks and enter the final puzzle room. Here, he must freeze a Kabu and kick it around a turn to hit a pink switch. Then, he must quickly use Pipe Mouth to jump across a platform and break a cracked wall. Behind it lies the final Waddle Dee. After rescuing him, Kirby can exit and activate a sparkling spot on a small hill, which spawns a Gotcha Capsule. The goal is directly behind the Capsule.
Alternate Path[]
Like most Mid-Boss Towers, this stage contains an alternate-and harder-path. At the beginning, if Kirby follows the path leading to the Maxim Tomato, he can climb small brick ledges on the side of the wall. After making it to the top, going behind a wall, and climbing a ladder, Kirby is offered a Treasure Chest with Star Coins and a Gotcha Capsule inside. He can then proceed through an open window into a dilapidated living room. If he boards the Warp Star, he begins a new journey atop the rooftops.
Apart from the path forward consisting near exclusively of riding Warp Stars, most of the level remains the same, albeit slightly more difficult. Every collectible and mission is still able to be collected/completed. However, some differing elements include:
- Every mid-boss fight now pits Kirby against a Twin variant of that mid-boss; for Twin Frosty, Kirby must fight 3.
- Shotzos are present in the top corners of the Twin Frosty fight.
- The fourth Waddle Dee is instead found by activating a sparkling spot on the top right of the area where Kirby fights Twin Bonkers. This spawns the cage on the subsequent platform.
- Less enemies are presented as Copy Ability choices before each fight.
- Every puzzle room is made significantly dimmer.
- Each puzzle room is mostly the same, but they all force the player to be more precise.
- In the Cone Mouth room, the platforms are skinnier and move faster.
- In the Vending Mouth room, hard blocks are added blocking one platform, and the platform in front of the shutter is covered with ice.
- In the Car Mouth room, the blocks push back out much faster.
- In the Pipe Mouth room, the platform to jump off of is much skinnier and sinks faster.
- At the end, the player may use Dome Mouth to reveal a switch. Activating it causes many food items and Star Coins to fall from the sky, along with a Gotcha Capsule.
Missions[]
Italicized missions are hidden from view on the player's first playthrough.
- Clear the stage: When Kirby clears the stage for the first time, he will automatically rescue 3 Waddle Dee prisoners from the golden cage.
- Save the hidden Waddle Dees: 5 Waddle Dee prisoners can be found here, their locations being the following:
- In the Cone Mouth puzzle room, inside a crack in the ground.
- In the Vending Mouth puzzle room, behind the shutter.
- In the Car Mouth puzzle room, behind the cracked wall.
- Below the three broken-off bridge platforms found right after the Car Mouth room.
- In the Pipe Mouth puzzle room, behind the cracked wall.
- Remove 4 wanted posters: Several wanted posters of Elfilin are scattered around the level, and they can be removed with any attack. Their locations are:
- In the Cone Mouth puzzle room, near the bottom right of the room.
- In the Vending Mouth puzzle room, high above the door. It can be reached by collecting the room's Waddle Dee, then by following the blocks above the door.
- In the Car Mouth puzzle room, next to the Mookie found near the entrance.
- In the Pipe Mouth puzzle room, on a wall behind the cracked wall.
- Beat Twin Wild Frosty without getting hit: If Kirby manages to defeat Twin Wild Frosty at the end without getting hit a single time, the mission is deemed completed.
- Take a detour and find a Maxim Tomato: Immediately after beginning the stage, Kirby can head into a small crevice in some rubble off to the left, which leads to a Maxim Tomato.
Blueprint[]
The Frosty Ice Blueprint is found near the end of the stage. After defeating Twin Wild Frosty, the Blueprint can be found inside of a Treasure Chest. The Blueprint can be used to evolve the Ice ability at Waddle Dee's Weapons Shop.